Introduction
Colours can be brought in the LaTeX document by importing the package color or xcolor. xcolor package is more flexible and supports a larger number of colour models. Apart from that, both the packages provide a common set of commands for colour manipulation. Example to highlight the text is shown below:
1 2 3 4 5 6 7 8 9 10 11 12 13 14 15 16 17 18 19 20 21 | \documentclass{article} \usepackage[utf8]{inputenc} \usepackage[english]{babel} \usepackage{xcolor} \begin{document} This example depicts various examples to use the \texttt{xcolor} package to change the colour in \LaTeX. \begin{itemize} \color{red} \item Item One \item Item Two \end{itemize} \noindent {\color{blue} \rule{\linewidth}{0.7mm} } \end{document} |
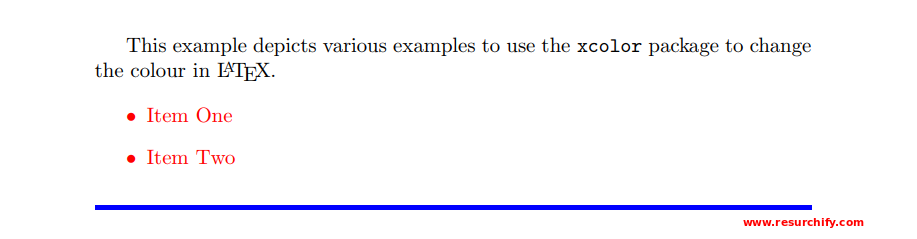
In the above example, the package xcolor is imported using the command \usepackage{xcolor}. After this, the command \color{red} sets (highlights to) the red colour for the line items as here, for the itemize environment.
The colour of the second block of text, marked by { and } with \noindent, is set (highlight) to blue with the command \color{blue}. After this, a horizontal ruler of 0.7mm-thickness is inserted by \rule{\linewidth}{0.7mm}.
The number of colour names available depends on the driver. But there are few colours which can be used with any driver. Those are: yellow, purple, green, black, white, blue, magenta and cyan.
Basic usage
The colour system of the xcolor package revolves around the concept of colour models, the mode of colour and the names of the colour.
1 2 3 4 5 6 7 8 9 10 11 12 13 14 15 16 17 18 19 20 21 22 | \documentclass{article} \usepackage[utf8]{inputenc} \usepackage[english]{babel} \usepackage[dvipsnames]{xcolor} \begin{document} This example will show the usage of \texttt{xcolor} package in changing the colour of elements in \LaTeX. \begin{itemize} \color{Green} \item First Line item \item Second Line item \end{itemize} \noindent {\color{Red} \rule{\linewidth}{0.6mm} } We can also set the colour of text now and make it little different also \textcolor{blue}{easily}. For example, little different colour here like \colorbox{Green}{also}. \end{document} |

If the example stated above is compared with the example in the Introduction, there are few changes.
Firstly, the command used to import the package xcolor now has an additional parameter.
- dvipsnames: Makes the colour names for the driver dvips available. With the help of this set, a set of new colours is available like RubineRed, BurntOrange and ForestGreen.
The other parameters that provide different set of colours are svgnames and x11names. Few other drivers are: dvipdf , xdvi, pdftex, dviwin, emtex, dvipsone, truetex and xtex but there is no need to specify them.
There are two new commands which have been used in the example.
- \textcolor{blue}{easily}: This command will change the colour of the inline text. It takes two parameters : the colour and the text whose colour has to be changed. In the example above, the word easily is printed in blue. So, “blue” is the colour and “easily” is the text.
- \colorbox{Green}{also}: This command will change the background colour of the text passed. Text and colour are the two parameters here. In the example above, the word “also” is printed in Green.
Creating your own colours
In LaTeX, we can define our own colours. Below is an example that shows the same.
1 2 3 4 5 6 7 8 9 10 11 12 13 14 15 16 17 18 19 20 21 22 | \documentclass{article} \usepackage[utf8]{inputenc} \usepackage[english]{babel} \usepackage[dvipsnames]{xcolor} \definecolor{mycolor1}{rgb}{0.868, 0.188, 0.48} \definecolor{mycolor2}{RGB}{229, 148, 12} \definecolor{mycolor3}{cmyk}{0, 0.708, 0.49, 0.112} \definecolor{mycolor}{gray}{0.8} \begin{document} Colours defined by me with different models: \begin{enumerate} \item \textcolor{mycolor1}{Color with rgb} \item \textcolor{mycolor2}{Color with RGB} \item \textcolor{mycolor3}{Color with cmyk} \item \textcolor{mycolor}{Gray color with gray} \end{enumerate} \end{document} |
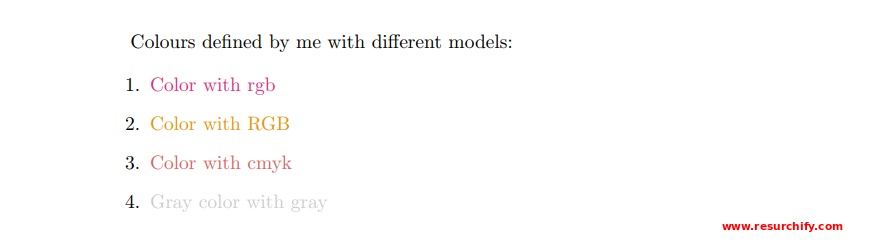
The \definecolor command takes three parameters:
- the name of the new colour that you are creating
- the model that you are using to create the colour namely, RGB, rgb, cmyks
- the colour definition
The numbers in the bracket represent the portion of each colour that is mixed to get the final colour.
- rgb: This is Red , Green, Blue. It takes three values separated by comma ranging between 0 and 1.
- RGB: Red, Green and Blue. The value that they take are integers between 0 and 255.
- cmyk : This is Cyan, Magenta, Yellow and black. This takes four values separated by comma between 0 and 1.
- gray: This is Grey scale and it takes a single value between 0 and 1.
xcolor-only colour models
xcolor package has some exclusive commands that enable support for more colour models.
1 2 3 4 5 6 7 8 9 10 11 12 13 14 15 16 17 18 19 20 21 22 23 | \documentclass{article} \usepackage[utf8]{inputenc} \usepackage[english]{babel} \usepackage[dvipsnames]{xcolor} \colorlet{LighterRubineRed}{RubineRed!60!} \colorlet{Color1}{blue!10!orange!80!} \definecolor{Color2}{HTML}{00F9EE} \begin{document} This document depicts examples on ways to use the \texttt{xcolor} package. \begin{itemize} \item \textcolor{Color1}{First Line item} \item \textcolor{Color2}{Second Line item} \end{itemize} \noindent {\color{RubineRed} \rule{\linewidth}{2mm} } \noindent {\color{LighterRubineRed} \rule{\linewidth}{2mm} } |
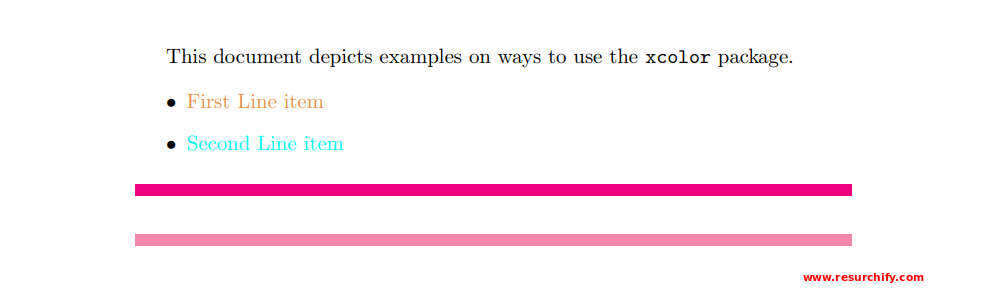
We have defined three new colours in the example above through different ways.
- \colorlet{LighterRubineRed}{RubineRed!60!} : We have created a new colour named LighterRubineRed with 70% the intensity of the original RubineRed colour. This can be thought of a colour with 30% white and 70% RubineRed.
- \colorlet{Color1}{blue!10!orange!80!} : We have created a new colour called Color1 with 10% blue and 80% orange. Here, instaed of two colours, you can include as many colours as you want.
- \definecolor{Color2}{HTML}{00F9EE} : Color2 is created using this command by making use of HTML model. Colours through this model are created using 6 hexadecimal digits, the characters A,B,C,D,E and F and they must be upper-case.
Following are the colour models that only xcolor supports:
- HTML : RRGGBB
- cmy : cyan, magenta, yellow
- wave : Wave length. Between 363 and 814.
- Gray : Grey scale, a number between 1 and 15.
- hsb : hue, saturation, brightness
Setting the page background colour in LaTeX
\pagecolor sets the background colour of the entire document.
\pagecolor{blue}
\color{red}
The command \pagecolor{blue} set the colour of the entire page to blue. This change will reflect for the complete page unless another command changes the colour.
The command \nopagecolor will change the background back to normal.
Tips Reference
Following are the basic colour available in LaTex with their names:
blue, red, green, cyan, black, magenta, yellow, white

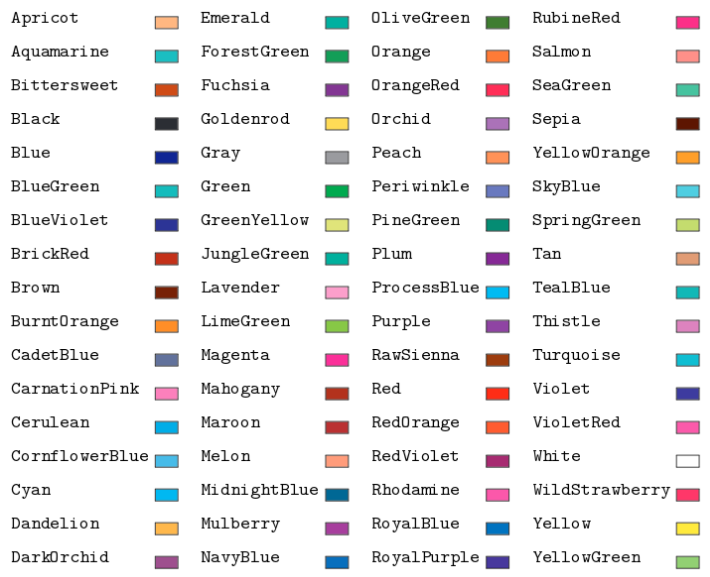
Following are the xcolor color names available with the dvipsnames option: